Troubleshooting Questions
If you need any parts or have any technical issues that are not listed here, the best way is to email (help@apluslift.com) or text (425-300-2600) us with some pictures and the nameplate. Our technician will follow up with you as soon as possible.
General Questions:
I did not find the installation manual.
We apologize. The factory may have forgotten to include the installation manual in the package. You may download the most recent installation manual on the product listing page (see "Installation Manual").
I have a damaged/defected/missing part?
For any damaged/defected/missing parts, please email or text us some pictures. We will ship you replacement parts.
Please check the package for damage. When the trucking company picks up the package from the warehouse, the driver checks the package and signs the paperwork. Usually a broken package is caused during the transportation. If the package is damaged, please mark the damage details on the driver's receipt BY YOURSELF (not by the driver). Also please take some pictures, which will help us file a claim to the trucking company.
The factory checks each part and tests each product before packing it. Occasionally the product may be missing a part, but it is rare.
If you want to file a claim for a damaged/defected product, please email or text us and our technician will follow up with you. If the damage/defect is caused during the transportation, we will help you prepare a claim to the trucking company or we will file the claim on your behalf. If the defect is caused by the factory, our technician will check with the factory and resolve the issue with you.
HW-10KBP, HW-10KOH, and HW-10ASY:
What are the color codes?
HW-10KBP and HW-10KOH color codes are RAL 5002 (Blue) and RAL 1023 (Yellow). HW-10ASY color codes are RAL 9005 (Black) and RAL 1023 (Yellow).
Which arms should go front for the HW-10KBP/HW-10KOH/HW-10ASY lifts?
Please set shorter (3-stage) arms to the front and longer (2-stage) arms to the back. To use the arms in asymmetric way, please pull forward a vehicle so that about 1/3 of the vehicle is in front of the column and about 2/3 of the vehicle is behind the column.
How to connect electric wires to the power unit?
Please use a licensed electrician for 220V electrical power.
For 220V split phase electric power, please connect hot 1 to brown, hot 2 to blue, and ground to yellow/green.
To connect wires to a contactor (if needed), the wiring is Brown-L2, Blue-L3, Green-L2, Red-L3.
How to bleed the air from cylinders?
Please run the arms up and down several times without a vehicle. The air will bleed from cylinder vent holes automatically.
I pushed the power button, but nothing happened.
Please make sure that you pushed and held the power button when you ran the car lift. hydraulic fluid needs to be pumped to the cylinders.
First, please measure the voltage between two hot lines and make sure it is 220-240V (or 110-120V). The motor will not start if the voltage is too high or too low. Please use a licensed electrician for 220V (or 110V) electrical power if you do not have it.
Second, please check to see if the contactor has power input after pushing the push button. If the contactor has no power input, most likely the push button is broken. Please contact us for that.
Third, if the voltage is good, please push the green button (see picture below) on the contactor to enable the power to the motor directly. If the motor can run after pushing the button, most likely the contactor is broken. Please contact us for that.

If the motor still does not start, Please email or text us. Please prepare the following pictures. Our technician will follow up with you.
- A picture of the wiring to power unit and the measurement of 220V
- The nameplate of the motor
- The serial number on the motor aluminum body
The lift arms can go up but cannot go down.
First, please run the arms up and down several times. There may be some air in the cylinder. They will bleed out and run as normal.
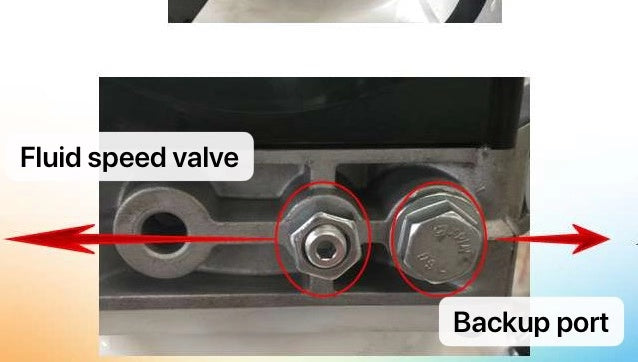
Second, please adjust the fluid speed valve on the power unit (see the picture below). Please adjust no more than 1/4 of a circle each time. Otherwise the lift may go down too fast.

Third, please check to see if the chains or cables are stuck somewhere.
Fourth, please check to see if the fittings (connecting hoses to power unit or cylinders) are clogged.
If you still have the issue, please email or text us. Our technician will follow up with you.
The lift arms go down too slow.
If the lift is newly installed, there is air in both cylinders. Please run the lift arms full up and full down several times to bleed the air out of the cylinders.
The lowering speed is about 60 seconds for safety reasons. The speed is controlled by a fluid speed valve on the power unit. Some lifts will go down much faster with a vehicle on it.
If the arms still go down slow, please adjust the fluid speed value counterclockwise 1/4 of a circle each time. Otherwise the lift may go down too fast.

My hose is leaking hydraulic oil.
Usually it is because the connection between the hydraulic hose and the cylinder/power unit is not fastened. There is an O-ring on the hose and an O-ring with the fitting to prevent it from leaking. Please use a wrench to lock the fitting. You may check this picture for reference. If the fitting cannot be tightened, please text or email us.


How to install tool trays and door guards?
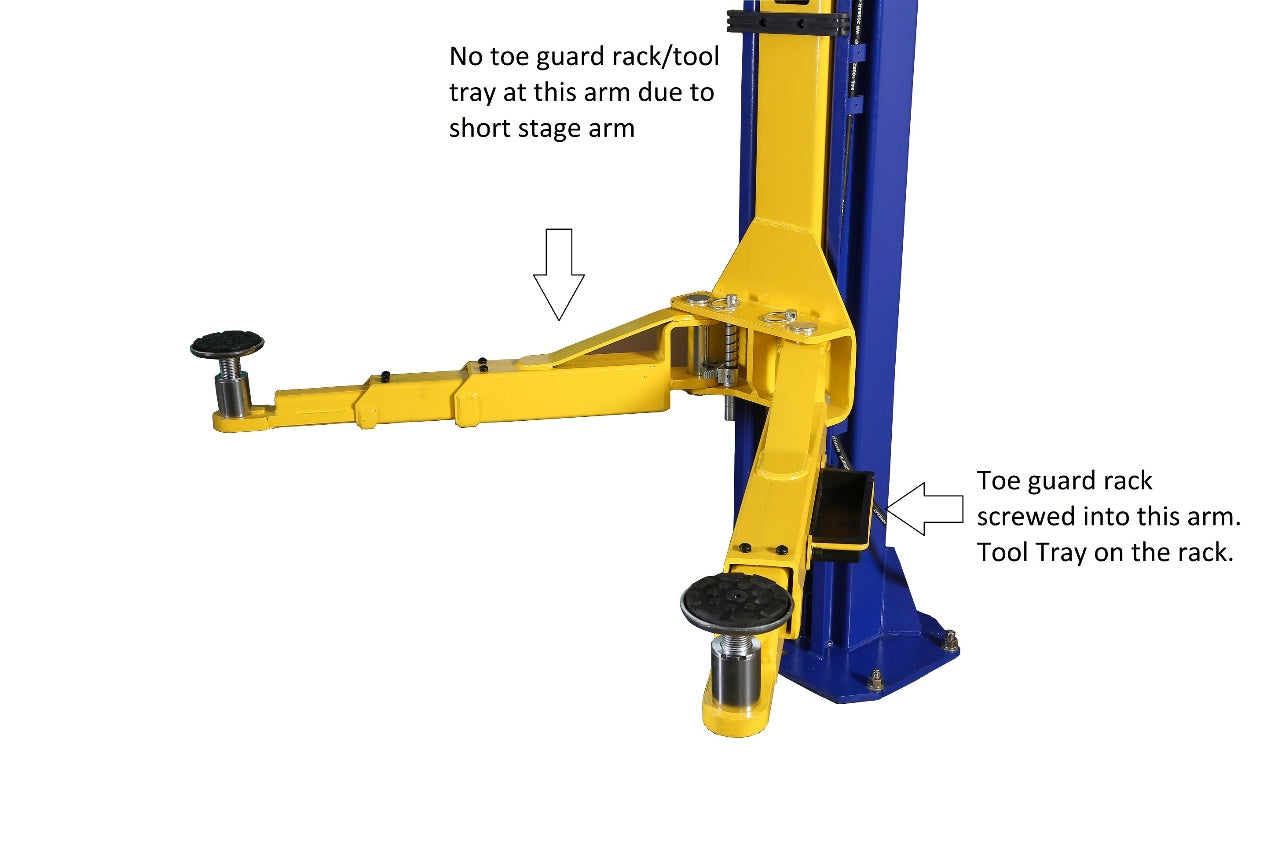
Please check the picture below for installing tool trays. The door guards are on the top of the carriages (there are two small holes drilled)

What to do with the big snap rings on adjustable screw pads?
The big snap ring locks the bottom of the adjustable screw pad (pad holder) under the arm to prevent the pad holder from dropping out of the arm hole. If you use truck adapters, please remove the big snap rings.
I am missing a bracket for the safety bar (HW-10KOH and HW-10ASY lifts).
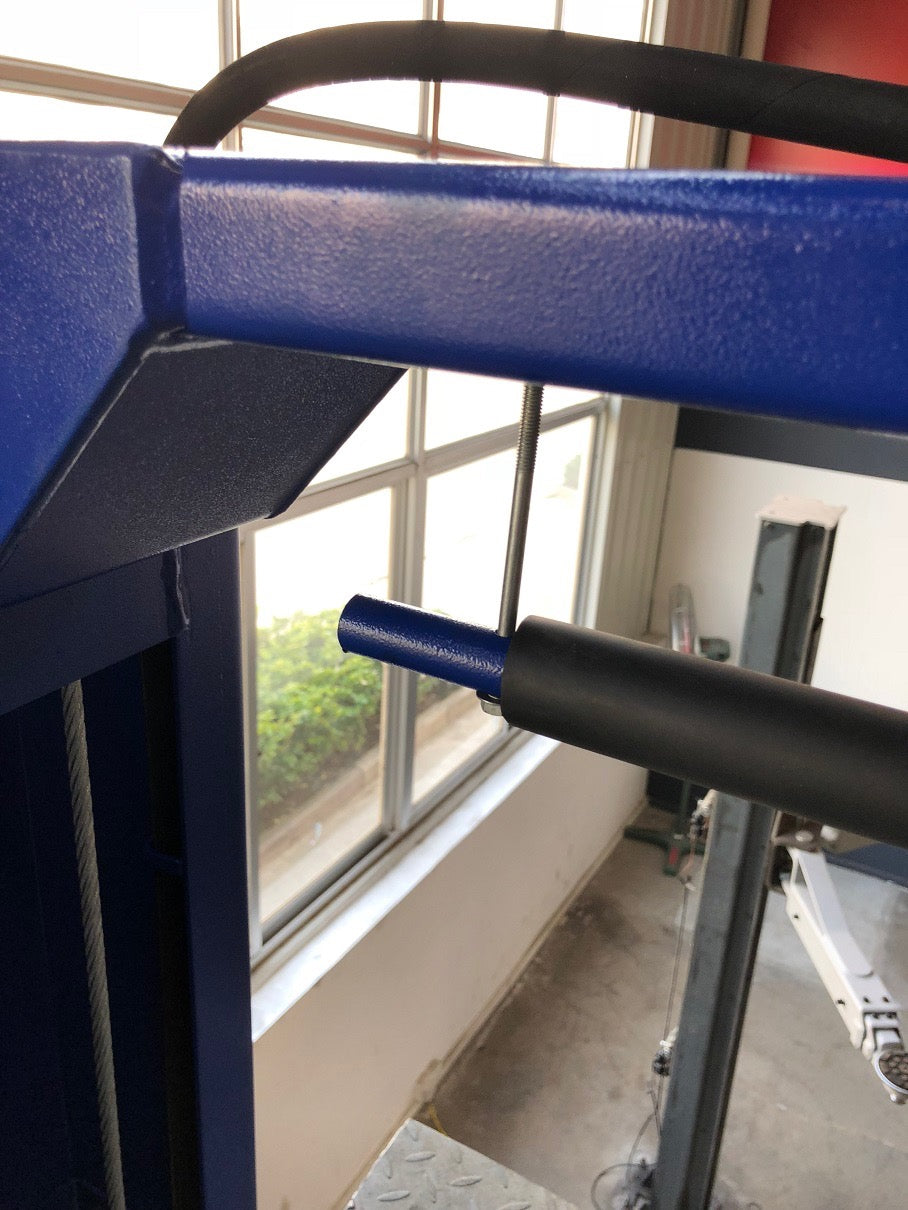
The HW-10KOH and HW-10ASY lifts have only one bracket. The other side is a long bracket. You may check this picture below.

The two posts flex when I lift a vehicle (HW-10KBP-A lift).
The car lift is made by steel. It will flex 1-2 inches when you lift a vehicle as the tops of both columns are open.
Please check if the base plates move. If the base plates are lifted a little bit, please fasten the anchor bolts.
Also, please check if both columns flex about the same amount. If one column flexes more than the other column, please contact us.
How do I replace a hose (or a fitting)?
To avoid oil spilled all around, please do the following steps:
- Please lower the lift to the ground. So that most hydraulic oil will flow back to the oil tank.
- Please prepare an oil container under the fitting. Remove the old hose end from the fittings. Keep the old hose end higher than the oil tank.
- Please be aware that there is hydraulic oil in the old hose. When you remove the old hose end from the oil tank, keep the hose in "U" shape. Then release the hydraulic oil to the prepared container.
- Please connect the new hose to the two fittings.
The anchor bolt(s) pulled out when I lifted a vehicle.
If the anchor bolts were expanded and torched with 125 ft/lb but they kept popping out after a few uses, the concrete tensile strength is weak. It happens when the concrete tensile strength is below 3500 psi or the concrete is old (such as over 20 years).
Please cut two 24"L x 24"W x 30"deep (or 36"L x 36"L x 12"deep) slabs at the positions of two posts and pour 3500 psi tensile strength concrete with steel or fiber mesh reinforcement. Please reinstall the car lift after the concrete is hardened (about 25-30 days).
Carriages not lowering all the way down.
There are only a few things that can be holding up the carriages:
1. A bind in the chain catching behind the cylinder.
Solution: Check the chain behind the cylinder.
2. One of the cables was getting caught and restricting downward movement.
Solution: Check that both cables are routed properly and that they are free at all four ends while being the same tension. Please see manual for adjustment instructions.
3. The lock is inhibiting the carriage from lowering properly.
Solution: Firmly press down on the lock release(s) to ensure that they are being released properly.
If the electrical is connected as well as everything else is installed properly you might try to run the lift up to release the tension on the chains.
If none of these solutions are working please email into help@apluslift.com
My issue is not listed above.
Here are a few other common issues that we resolved with customers.
- If both hose and cables are a little too short or too long, please check if the distance of two posts (from inside to inside) is 109 13/32" (that's about 9 feet 1 3/8 inches). Please measure it by yourself if the lift was installed by an installer. If the distance is correct, please send us a picture with the number on the hose/cable, we will check and get back to you.
If solutions above does not apply or solve your issue, please email (help@apluslift.com) or text (425-300-2600) us with some pictures and the nameplate (on one of the posts with the model name and manufacturing date on it). Our technician will follow up with you.
Disclaimer: We've sold thousands of HW-10KBP, HW-10KOH, and HW-10ASY car lifts each year. We will make sure every car lift is fully functional during the warranty time or you get your money back. Usually our technician will get back to you in the same day. Please be patient and cooperative.
TR-10C and TR-10CX:
What are the color codes?
The color codes are RAL 9005 (Black) and RAL 1018 (Yellow).
I have an installation question.
Please email or text us with some pictures and the nameplate (on one of the posts with the model name and manufacturing date on it). Our technician will follow up with you.
HW-8S, HW-8SXLT, MSJ-40, and ABJ-40:
How to pull out the rod from the cylinder so I can wire the cables?
Please pull out the rod manually. Initially it may be stuck and hard to pull, but after you twist and pull a few times, the rod can be pulled out smoothly.
Please never use power unit to pull out the cylinder rod when you wire the cables.
How to connect electric wires to the power unit?
Please connect hot to brown, neutral to blue, and ground to yellow/green.
I pushed the power button, but nothing happened.
Please make sure that you pushed and held the power button when you ran the car lift. hydraulic fluid needs to be pumped to the cylinder.
First, please measure the voltage between hot and neutral lines and make sure it is 110-120V. The motor will not start if the voltage is too high or too low.
Second, please check to see if the contactor has power input after pushing the push button. If the contactor has no power input, most likely the push button is broken. Please contact us for that.
Third, if the voltage is good, please push the green button (see picture below) on the contactor to enable the power to the motor directly. If the motor can run after pushing the button, most likely the contactor is broken. Please contact us for that.

If the motor still does not start, Please email or text us. Please prepare the following pictures. Our technician will follow up with you.
- A picture of the wiring to power unit and the measurement of 110V
- The nameplate of the motor
- The serial number on the motor aluminum body
All 4 lift cables are not long enough.
Please manually pull out the piston rod of the cylinder to its maximum position. When the rod moves a little bit, it will become smooth to move.
It is very unlikely that all 4 cables are too short. But if a cable is too short, please email/text a picture of the number/mark on the cable. Our technician will follow up.
The lift arms go down too slow.
If the lift is newly installed, there is air in both cylinders. Please run the lift arms full up and full down several times to bleed the air out of the cylinders.
The lowering speed is about 40 seconds for safety reasons. If the lift still go down slow, please contact us.
Can I roll the 4-post car lift with a vehicle on it?
Please always remove the vehicle first before you roll the 4-post car lift to another place. It is NOT safe to move the car lift with a vehicle on it.
How do I replace a hose (or a fitting)?
To avoid oil spilled all around, please do the following steps:
- Please lower the lift to the ground. So that most hydraulic oil will flow back to the oil tank.
- Please prepare an oil container under the fitting. Remove the old hose end from the fittings. Keep the old hose end higher than the oil tank.
- Please be aware that there is hydraulic oil in the old hose. When you remove the old hose end from the oil tank, keep the hose in "U" shape. Then release the hydraulic oil to the prepared container.
- Please connect the new hose to the two fittings.
My issue is not listed above.
Here are a few other common issues that we resolved with customers.
- If the jack tray cannot fit between two runways, please check if the runway was installed in the wrong direction. The distance between two runways should be about 38".
- If rods cannot be fitted to the holes on the cross beams, please check if the two cross beams were switched.the anchor bolts were expanded and torched with 125 ft/lb but they kept popping out after a few uses, most likely the concrete tensile strength is weak (especially when the concrete is old).
If solutions above does not apply or solve your issue, please email (help@apluslift.com) or text (425-300-2600) us with some pictures and the nameplate (on one of the posts with the model name and manufacturing date on it). Our technician will follow up with you.
Disclaimer: We sold thousands of 4-post car lifts each year. We will make sure every car lift is fully functional during the warranty time or you get your money back. Usually our technician will get back to you in the same day. Please be patient and cooperative.
HW-SL6600X:
What are the color codes?
The color codes are RAL 7016 (Grey) and RAL 2004 (Orange).
How to connect electric wires to the power unit?
Please connect hot to brown, neutral to blue, and ground to yellow/green.
There is a cable from the power unit and an extra cable. Which cable should I use?
The cable connected to the power unit is a testing cable. The factory tested each power unit before packing it. Please discard it and use the other cable to connect the power unit to a power outlet.
HW-12S:
I have an installation question.
Please email or text us with some pictures and the nameplate (on one of the posts with the model name and manufacturing date on it). Our technician will follow up with you.
MT1500, MT1500X, and MT1500XLT:
What is the orange color code?
The color code is PANTONE 165C (Orange).
I need help on putting the lift table together.
There are some YouTube videos online of people putting the lift table together. The lift table is mostly assembled. You may flip it over, connect the cylinder hose to the foot pedal, connect to air compressor, install accessories, and test it. Please do NOT to let the scissor frame sit on the cylinder hose.
How to connect foot pedal to cylinder and air compressor?
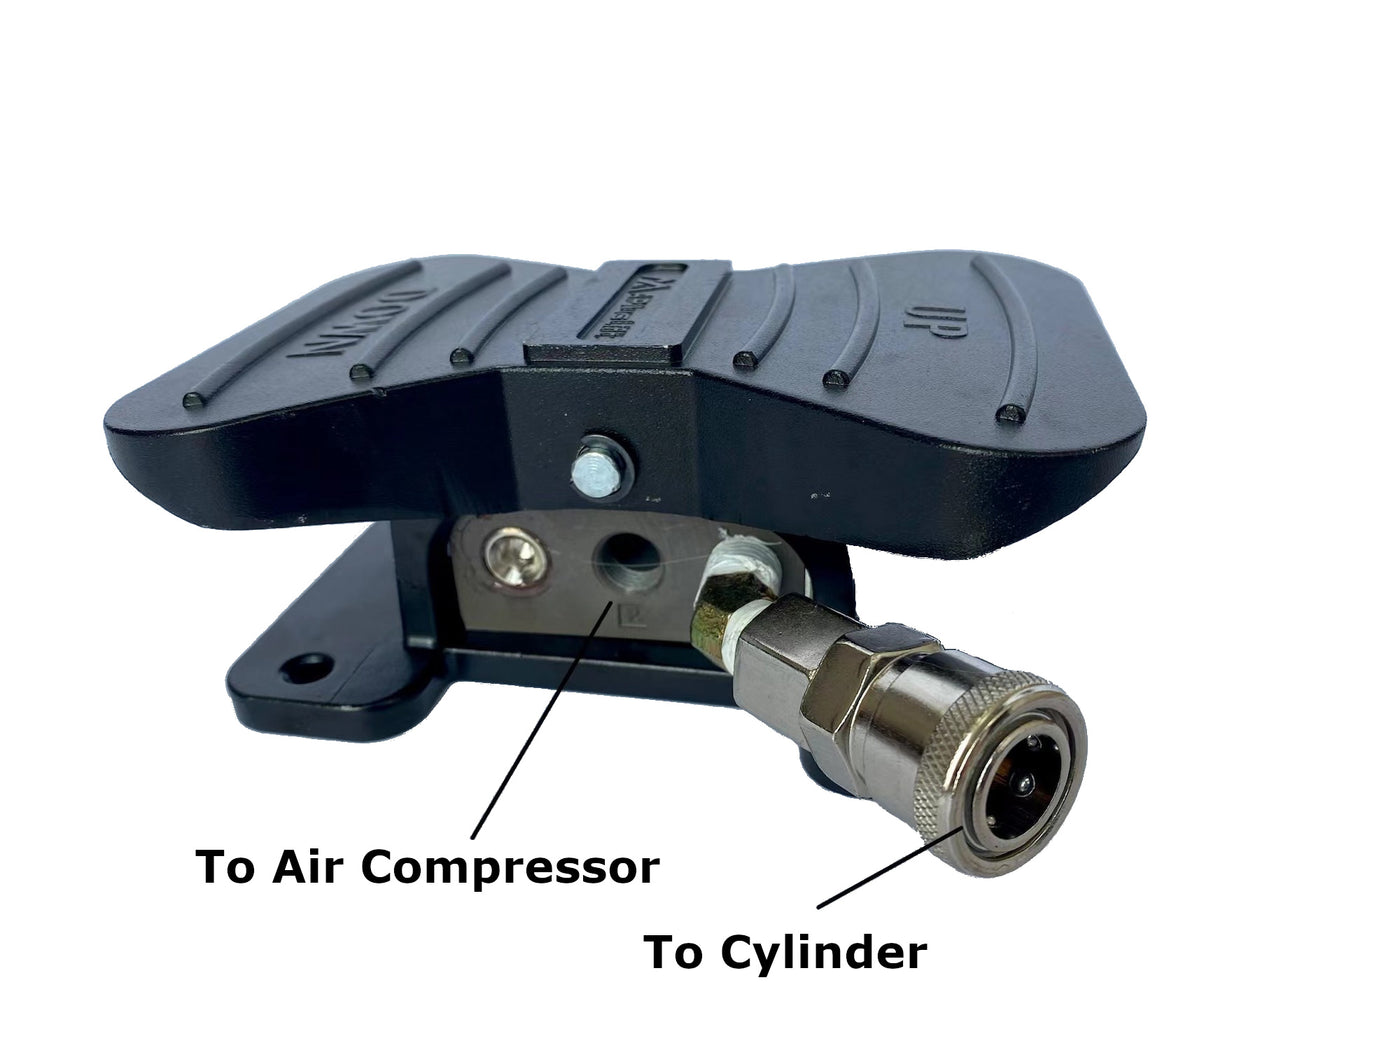
We changed to a new foot pedal that can stop at neutral position automatically. The middle hole is for connecting the pedal and the air compressor hose. Please see the picture below. You may watch this video as well.

I do not have the coupler connecting the foot pedal to air compressor hose.
The foot pedal has a coupler connecting to the cylinder hose. This coupler is specially made for the cylinder hose. It does not fit any air compressor hose. You may find a matched coupler for your air compressor hose at a local hardware store. The foot pedal hole is 1/4" female NPT.
There is hydraulic fluid on the ground.
The lift table is air operated. It does not use hydraulic fluid. The factory adds some extra lubricant oil in the cylinder to prevent it from getting rusty (especially when the lift table is used for a long time). You may wipe it off and use it as normal
I cannot install the front extension piece.
You may slide the front extension above the lift table and choose one of the two fitting positions to make the table 96" or 110" long. It is NOT connected side by side with the lift table.
What to do with the two extra grease zerks in the package?
There are two grease zerks at the both ends of the central shaft already. The two extra grease zerks in the bag are backup in case zerks on the shaft get lost during the transportation.
MT2200 and MT2200X:
What are the color codes?
The color codes are RAL 7016 (Grey) and RAL 2004 (Orange).
I did not receive the service jack or the portable kit.
The 2200LB motorcycle lift table does not come with a free service jack or portable kit. They are optional. You may email or text us to purchase a new one.
I need a replacement part.
Please email or text us and send us a picture of the worn/damaged/defected part and a picture for the nameplate (with model name and manufacturing date on it). Our technician will follow up with you.